Taskolly User Manual
This user guide is compiled with the intent of helping new users become familiar with the various features of the application, while also serving as a good reference for experienced users.
Furthermore, this user guide has been compiled to show how properly to use Taskolly to ensure optimum productivity in the workplace, while also promoting effective work management practice.
Note: Just like any other sophisticated software out there not all the features in this system may be obvious the first time a user signs up or logs in. Kindly take some time to try the different features in this application. For ease of understanding, simple language has been utilized. Up-to-date screenshots of the application have also been incorporated to help the user understand how the application is structured and the best way to use it.
Opening the App
The ‘Open App’ tab is located on the top right-hand side of the Taskolly homepage. To access or open the Taskolly application, a user is must click on this tab.
Upon clicking on this tab, the user will be directed to the app login panel. A screenshot of the app ‘login’ panel is shown below.
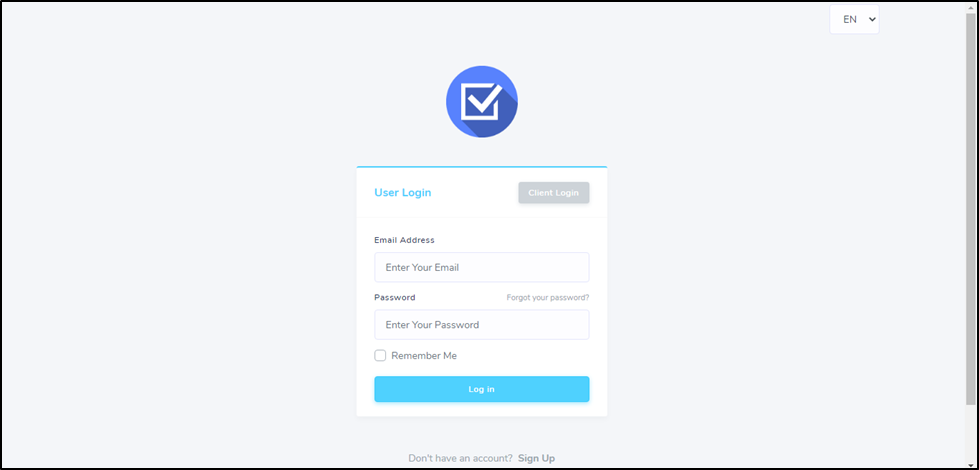
Fig 1- Screenshot showing the Taskolly App Login panel
New users will be required to sign up to start using the service. To do this, a user will click on the ‘Sign Up’ option, which is located at the bottom center of the login panel.
Upon choosing this option, the new user will be directed to the ‘Sign Up’ panel. A screenshot of the same is shown below.
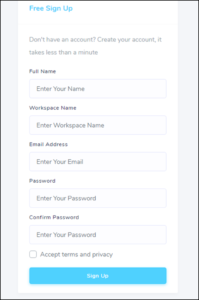
Fig 2- Screenshot showing the ‘Sign up’ panel
The new user should enter the relevant and correct details in the empty fields provided.
Note: Don’t forget to check the ‘Accept terms and privacy’ box.
Finally, the new user will click on the ‘Sign up’ tab located below the panel. If the information provided is correct, the new user will be incorporated into the system.
If an existing user has forgotten their password, they should click on the ‘Forgot your password’ option located just below the ‘Email Address’ tab.
Also, if a personal computer is being used, checking the ‘Remember me’ box can prove to be time-saving. Generally, clicking on the ‘Remember Me’ box tells a browser to save a cookie so that when an existing user exits the site without signing out, the next time they return without the need to reenter login details.
After signing up or logging, in a user is now ready to comprehensively interact with the application. The interface which appears is similar to the screenshot shown below.
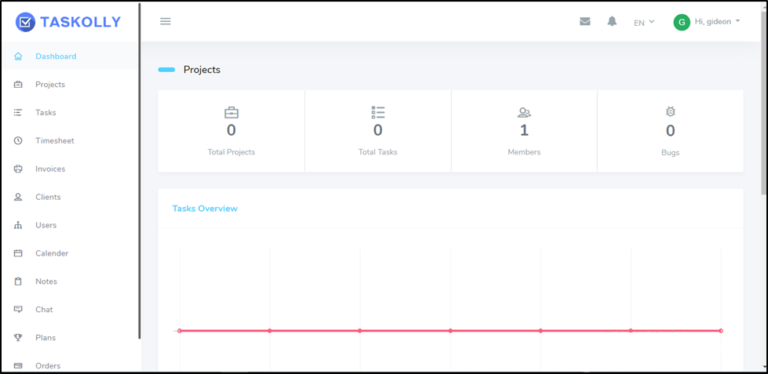
Fig 3 – Screenshot showing Taskolly app interface/panel
On the left side of this panel, different categories are shortlisted vertically. The various categories help users in the comprehensive use of the application. The various functionalities and categories are discussed in this section.
Dashboard
This is a graphical user interface that allows the user to view activity at a glance and also monitor the key activities and processes of the web application. Since the core functionality of the application is project management, the dashboard displays an overview of what is happening, including tasks and projects.
Projects
On the left side of the Taskolly application panel, is the ‘Projects’ tab. To get started, a user will simply click on this tab. Upon clicking this tab, the ‘Projects’ panel should appear.
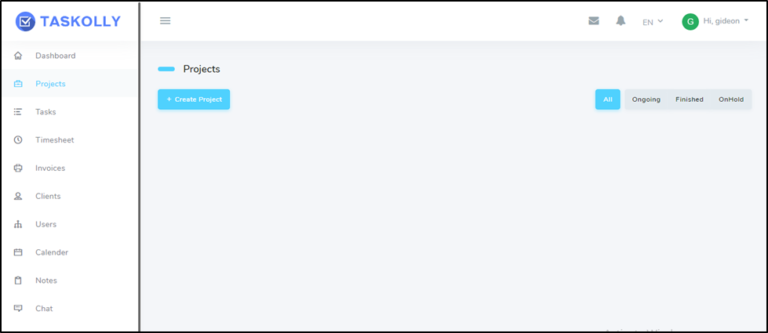
Fig 4- Screenshot showing the Projects Panel
In the Project panel a user will be able to:
- Create a Project – To do this, the user should click on the ‘Create Project’ tab located on the top left side of the ‘Projects’ panel. Upon clicking, a smaller ‘Create New Project’ panel will appear.
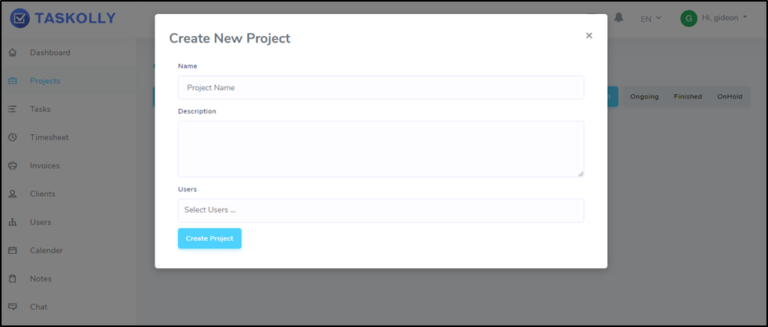
Fig 5- Screenshot showing ‘Create New Project’ panel
In this panel, the user is required to fill in a project name and description, and identify users of the project. This will be done in the provided tabs.
Upon filling in the various details, the user will click on the ‘Create Project’ tab located on the left bottom side of the ‘Create Project’ panel. A project will then be successfully created.
View the status of the ongoing projects – Under the ‘Projects’ panel, a user will also be able to view the status of the ongoing projects. To do this, the user will click on the tabs located on the right-hand side of the ‘Create Project’ panel.
- All – By clicking on this tab, the user will have a clear view of all projects.
- Ongoing – By clicking on this tab, the user can view the various ongoing projects.
- Finished – By clicking on this tab, the user can view finished projects.
- On hold – By clicking on this tab, the user will have a clear view of the various projects which are on hold.
Tasks
The ‘Tasks’ tab is located on the left-hand side of the Taskolly app panel. It is located just below the ‘Projects’ tab. To get started, the user will click on this tab.
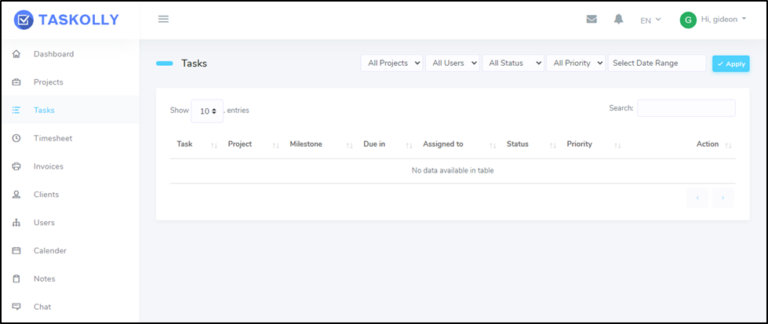
Fig 6- Screenshot showing the ‘Task’ panel.
On this panel, the user will be able to:
- View the current tasks – The user will be able to view a comprehensive breakdown of the various tasks at hand. The user may view the task, project, milestone, due date, assignments, status, priority and also action.
- The user can decide on the number of entries they wish to view at any one time. To change this, the user can click on the up and down arrows located on the ‘show entries’ tab. Here, the user can select whether they want to view 10, 25, 50 or 100 entries.
- The user can also filter the data they want to view. To do this, the user will move to the tabs located on the right-hand side of the ‘Tasks’ panel. The user can filter tasks in relation to projects, users, status, priority and date range.
Upon selecting the different parameters, the user can filter the available data by clicking on the ‘Apply’ tab located in the top right corner of the ‘Tasks’ panel.
Timesheet
Generally, this is a data table that the user can use to track a certain project or task. The ‘Timesheet’ tab is located on the left-hand side of the Taskolly Application, just below the ‘Tasks’ tab. To get started, the user will click on the ‘Timesheet’ option.
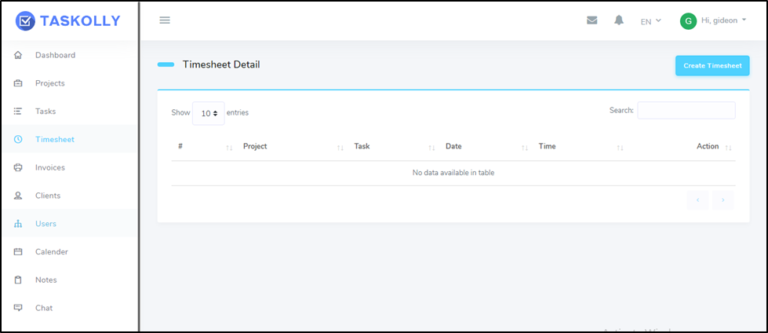
Fig 7- Screenshot showing the ‘Timesheet’ panel
On this panel, the user can:
- Create a new Timesheet – To do this, the user will click on the ‘Create Timesheet’ tab. This is located in the top right corner of the ‘timesheet’ panel.
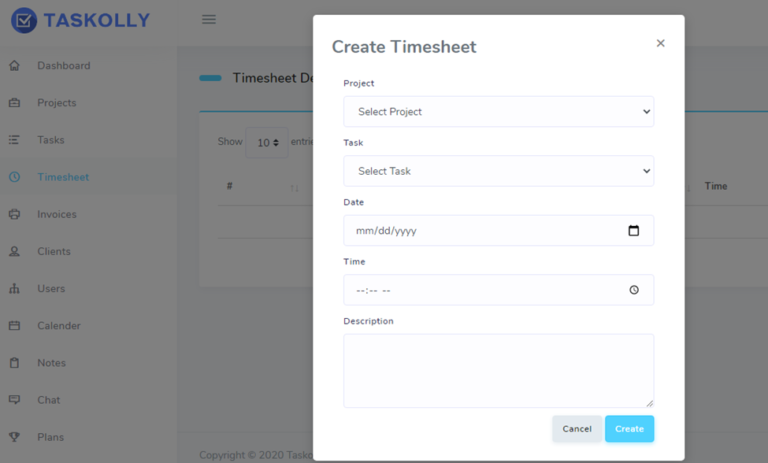
Fig 7- Screenshot showing ‘Create Timesheet’ panel
Under the ‘Create Timesheet’ panel, the user will fill in the details in the tabs provided. This includes selecting the names of the project and task, the date, time and description.
Upon filling in the details, the user will click on the ‘Create’ tab located in the right bottom corner of the ‘Create Timesheet’ panel. If the user wishes to cancel this operation and return to the ‘Create Timesheet’ panel, the user will simply click on the ‘Cancel’ tab.
View the status and timeline – just like in the ‘Tasks’ tab, the user can get an overview and view the status of the projects, tasks, date, time and also action.
The user can also decide on the number of entries they wish to view. Again, this is done by clicking on the up and down arrow on the ‘Show Entries’ tab. Here, the user can select the number of entries they want to view. A user can also search for a specific project or task. This is done by filling in the details of a project in the ‘Search’ tab.
Invoices
Serious project management involves invoice processing and invoice management. The Taskolly app allows the user to manage their invoices seamlessly. To get started on this, the user will click on the ‘Invoices’ tab located on the left-hand side of the Taskolly app panel, just below the ‘Timesheet’ panel.
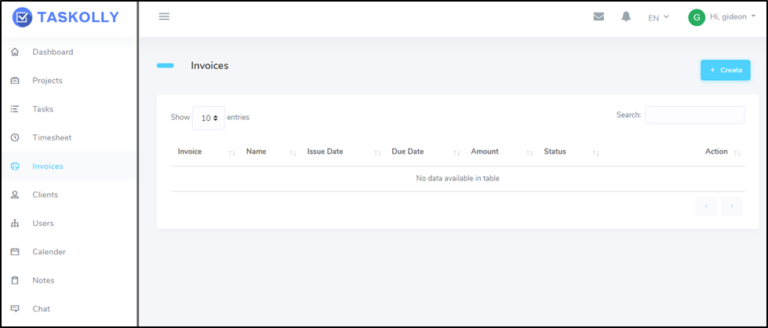
Fig 8- Screenshot showing ‘Invoices’ panel
Under the ‘invoice’ panel, the user can:
- Create an invoice – To do this, the user will click on the ‘Create’ option. This is located on the right-hand side of the ‘Invoice’ panel. A new panel will appear.
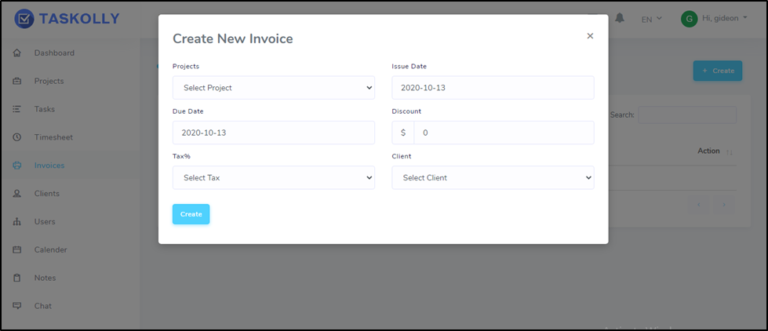
Fig 9- Screenshot showing the ‘Create New Invoice’ panel
The user should fill in the details, including the name of the project, issue date, due date, discount (if any) and tax, and also select the client. Upon filling in the correct and relevant details, the user will click on the ‘Create’ tab located on the left-hand side of the ‘Create New Invoice ‘panel.
- View the status of the invoice
The user can also view the status of available invoices. A user can select the number of entries they wish to view. This is done by clicking on the up and down arrow on the ‘Show Entries’ tab. Upon selecting the number of entries they wish to view, the data will be displayed in the table section.
The user can also search for a particular invoice; this is done by filling in the details of the invoice in the ‘Search’ tab.
Clients
A client is a person or company entitled to receive a service in return for some form of payment. TheTaskolly app allows the user to manage their clients seamlessly. The ‘Client’ tab is located on the left-hand side of the Taskolly app, just below the ‘Invoices’ tab.
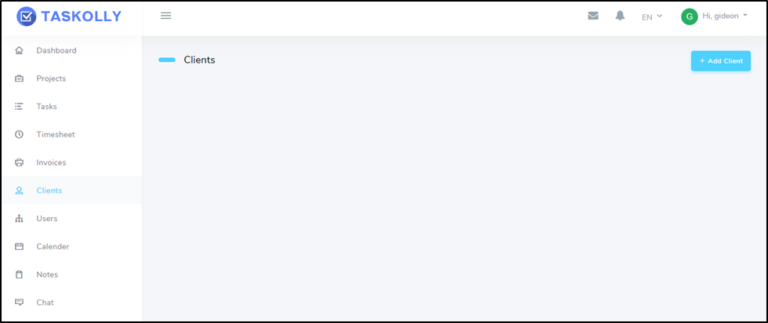
Fig 10- Screenshot showing the ‘Client’ panel
On this panel, the user will be able to:
- Add Client – To do this, the user will click on the ‘Add Client’ tab, which is located in the top right corner of the ‘Clients’ panel.
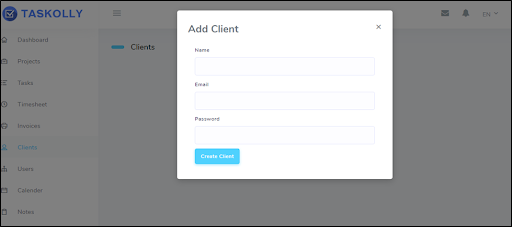
Fig 11- Screenshot showing the ‘Add Client’ panel
To successfully add a new client, the user is required to fill in a name, email and password. Upon filling in the relevant details, the user will click on the ‘Create Client’ tab located in the right bottom corner of the ‘Add Client’ tab.
- View the client list – The user can view the clients’ list. This will be automatically generated.
Users
With the understanding that many people may be involved in project/task management, the Taskolly app can be operated by different users.
To get started, a user will click on the ‘User’ tab located on the left-hand side of the Taskolly app, just below the ‘Clients’ tab.
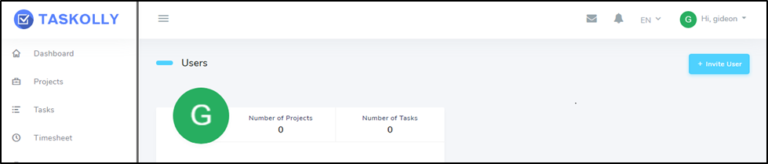
Fig 12- Screenshot showing ‘Users’ panel
In this panel, the user can:
- Invite a new user – The user can add a new user. This is done by clicking on the ‘Invite a new user’ tab, which is located in the right top corner of the ‘User’ panel.
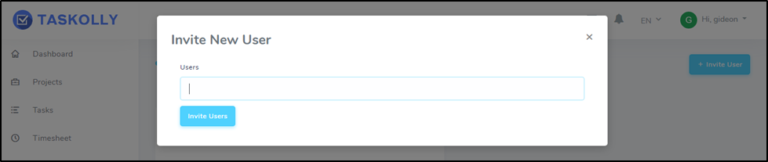
Fig 13- Screenshot showing the ‘Invite New User’ panel
In this panel, the user will enter the name of the new user, and then click on the ‘invite user’ tab located in the left bottom corner of the ‘Invite new user’ panel.
- Upon inviting a new user, the details of the new user will be displayed in the ‘Users’ panel. The number of projects and tasks associated with the new user will also be displayed.
Calendar
In project or task management, marking the date is always an important factor. For this reason, incorporating a calendar is highly important. In the Taskolly app, the user can check when a project/task is due to start by clicking on the ‘Calendar’ tab. This tab is located on the left-hand side of the Taskolly application, below the ‘Users’ tab.
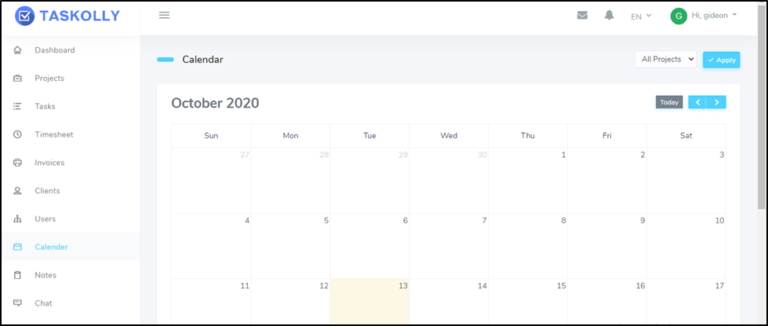
Fig 14- Screenshot showing the ‘Calendar’ tab on the Taskolly application
The user can filter the various projects they wish to view in relation to the timeline. This will be done by clicking on the drop-down arrow on the ‘All Projects’ tab in the top right corner and selecting the project they wish to view on the calendar. Upon selecting the preferred project, the user should click on the ‘Apply’ tab. The results, which will include the timeline of the project, will be highlighted on the calendar.
Notes
Having a notes section where a user can write down important points relating to project/tasks, etc., is essential. In the Taskolly app, the ‘Notes’ section is located on the left-hand side of the panel, just below the ‘Calendar’ tab. To get started, the user is required to click on the ‘Notes’ tab.
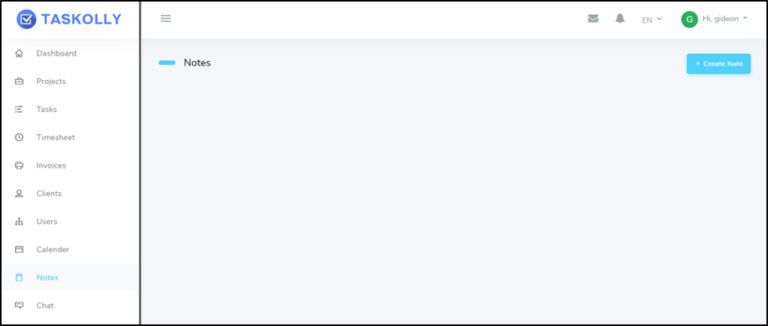
Fig 15- Screenshot showing the ‘Notes’ tab
In the ‘Notes’ tab, the user can:
- Create a new note – To do this, the user will click on ‘Create Note’ in the top right corner of the ‘Notes’ tab.
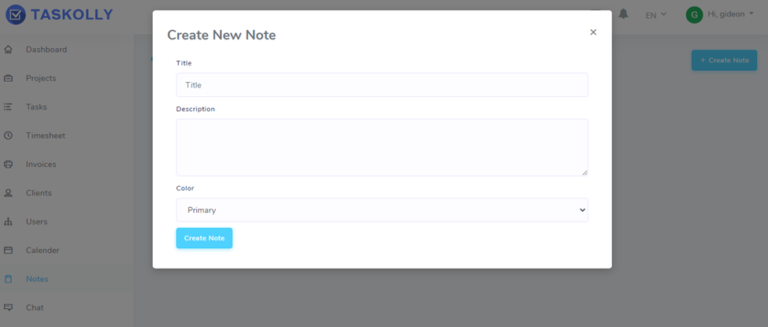
Fig 15- Screenshot showing ‘Create New Note’ panel
In this panel, the user can fill in different parameters, including title, description and color. The color section comprises primary, secondary, info, warning and danger, and can be selected by clicking on the drop-down arrow. Through selecting the color parameter, the user can indicate the note’s prioritization. Upon filling in the various details, the user will click on the ‘Create Note’ tab. This is located in the left bottom corner of the ‘Create new note’ panel. Dong this will complete the process of creating a note.
- Viewing notes – The user can also view the various notes and their priorities. This is displayed in the ‘Notes’ panel.
Chat
A comprehensive project management application should enhance engagement between its users. In the Taskolly app, this is achieved via the ‘Chat’ tab. This tab is located on the left-hand side, under the ‘Notes’ tab. To engage with other users via chat the user, will simply click on the ‘Chat’ tab.
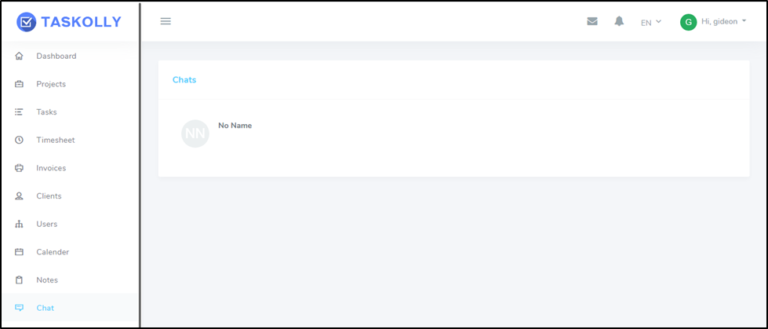
Fig 16- Screenshot showing the ‘Chat’ panel
In this panel, the user can view the different chats; these are often displayed under the user’s preferred name. By clicking on the name of the user, messages related to that user will be displayed. Whether an organization is big or small, clients tend to have different orders.
Taskolly can effectively help users to manage their orders. To get started, the user will click on the ‘Orders’ tab, which is located on the left-hand side of the Taskolly panel, just below the ‘Plans’ tab.
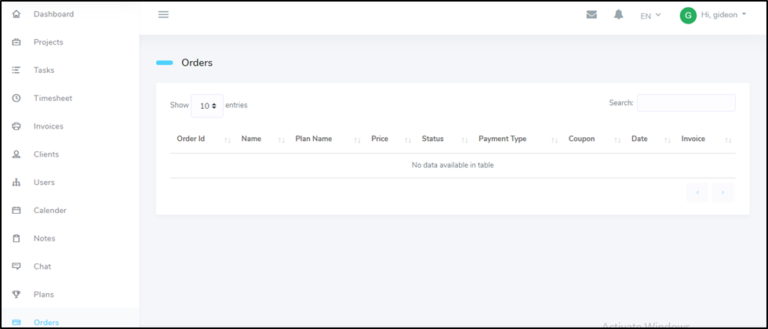
Fig 17- Screenshot showing the ‘Orders’ panel
In the ‘Order’ panel, the user will be able to:
- View the status of the orders – Here, the user can view orders via different parameters, which include order id, name of order, plan name, price, status, payment type, coupon, date and also invoice.
- In the ‘Order’ panel, a user can select the number of entries they wish to view. This is done by clicking on the up and down arrows on the ‘Show Entries’ tab. Upon selecting the number of entries they wish to view, the data will be displayed in the table section.
Workspace setting
Generally, a workspace can be defined as a form of digital storage where a user can create, store, update and even delete images and other forms of data.
In the Taskolly app, the workspace setting allows the user to change, update, save and also delete data.
To access this, the user will click on the ‘Workspace Settings’ tab, which is located on the left-hand side of the Taskolly app, just below the ‘Orders’ tab.
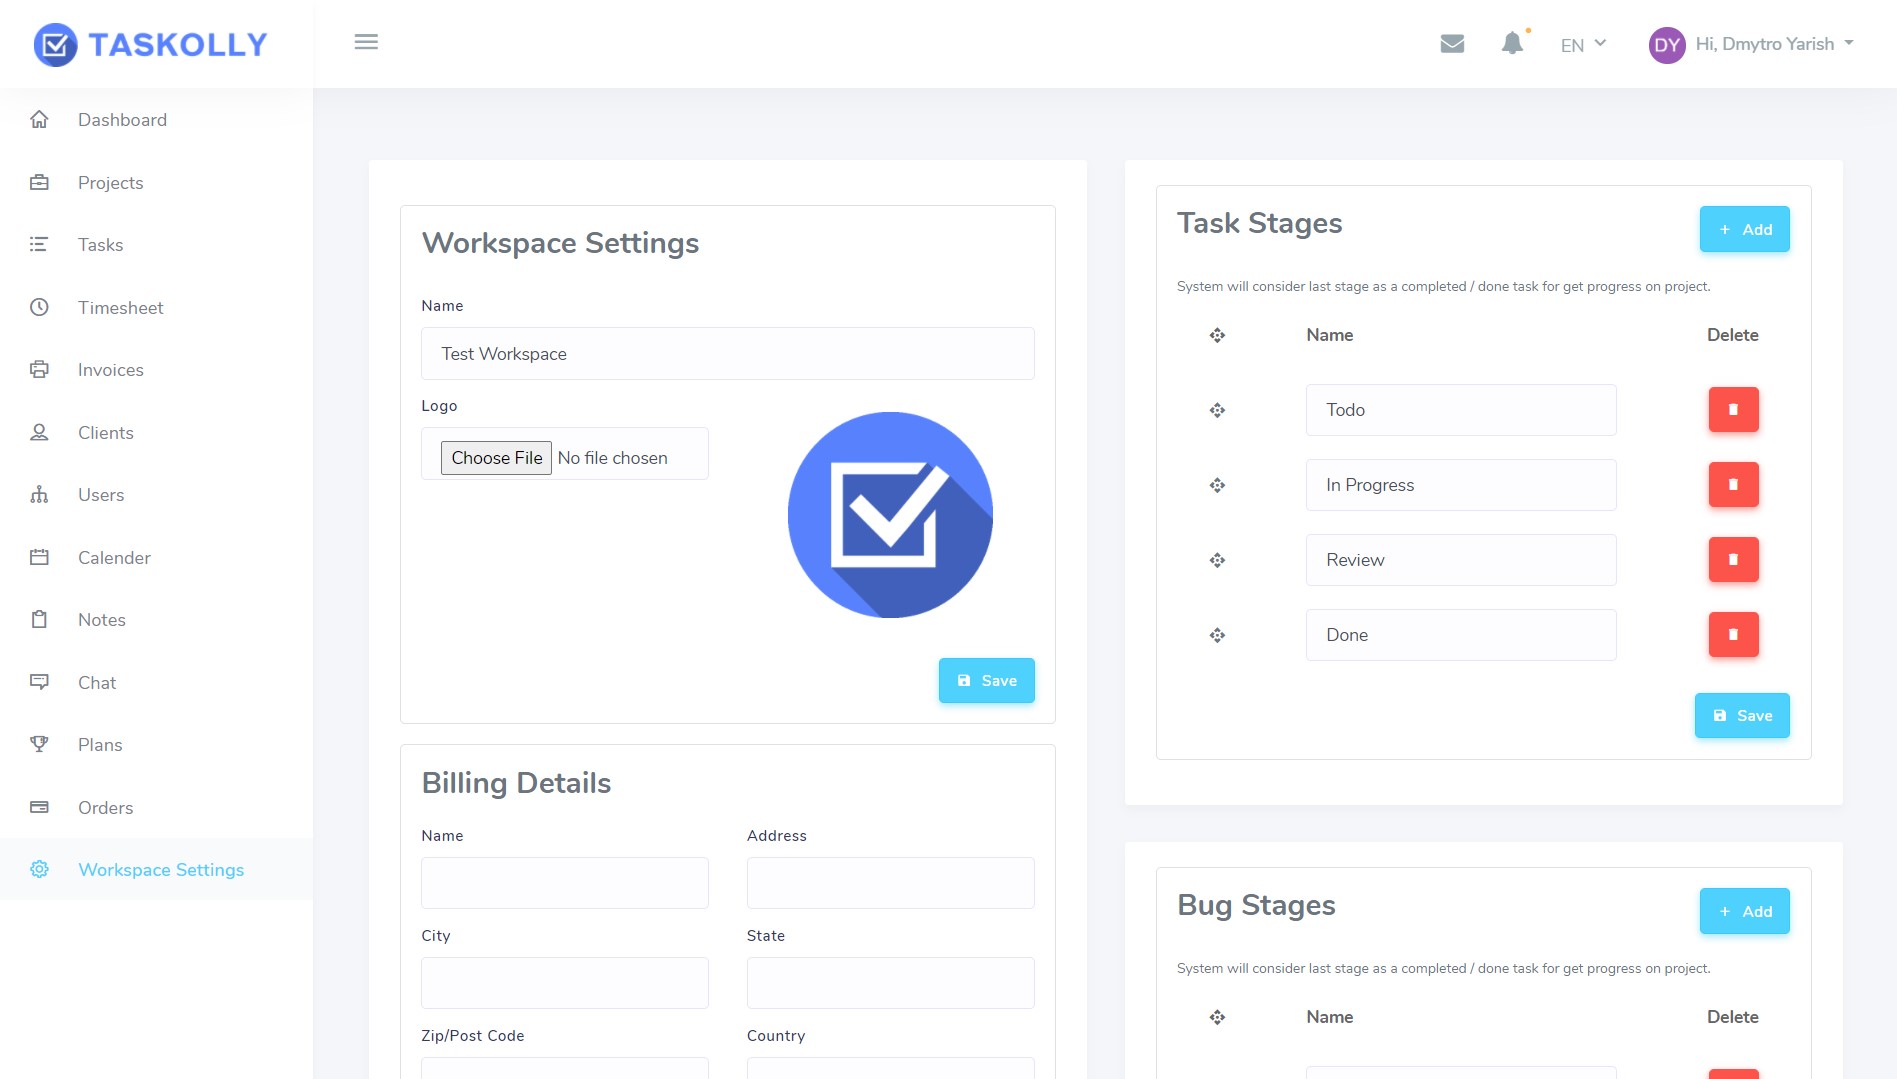
Fig 18- Screenshot showing the ‘Workspace setting’ panel in the Taskolly app
The ‘Workspace Settings’ panel has various features, including:
- Workspace settings – Here, the user can update their name and logo. Upon effecting these changes, the user can save the details.
- Task stages – The user can view different task stages. Here, the user can view the status of tasks, and also delete stages by clicking on the ‘Delete’ icon (marked in red).
- Bug Stages – In this section, the user can look at the various bug stages present in the system. A user can also add a bug by clicking on the ‘Add’ tab.
When a bug has been resolved, the user can click on the ‘Delete’ icon.
- Billing Details – In this section, the user can update the billing details by entering the relevant details in the spaces provided. In this case, the user will fill in the name, address, city, State, Zip/Post Code, country, and telephone number. Upon filling in these details, the user should click on the ‘Update’ tab.
- Payment Details – This section helps a user set payment parameters. In this section, the user will fill in details, including currency and currency code, in the spaces provided.
The user can opt for either Stripe or PayPal. To do this, the user will choose either of the two options and later click on the toggle key located below the payment platforms (Stripe and PayPal).
- Invoice Footer Details – In workspace settings, the user can fill in the invoice footer details. This can help track invoice details. In this section, the user will fill in the invoice footer title and the invoice footer notes.
Upon filling in this information, the user can click on the ‘update’ tab to ensure that the details are updated successfully.
- Taxes – In this section, the user can include tax details. To do this, the user will click on the ‘Create’ tab. Here, the user will fill in both the name and the rate. The name and the rate created will be displayed in the ‘Taxes’ section under ‘Workspace Settings’.
- Invoice section – This is the final section under ‘Workspace settings’, and is where the user can generate an invoice. The invoice generated is dependent on the details entered in the various sections.
- Invoice Template – A user can also use a different invoice template, depending on their preference. This is done by simply locating the ‘Invoice Template’ and clicking on the drop-down arrow. A user can choose different invoice templates depending on the city in which their client is based.
- Color – The color part of the Invoice section allows users to change the color of the invoice depending on their preference. A user can select any color by simply ticking the preferred color, thus effecting the color change on the invoice.
If a user is satisfied with the changes effected on an invoice, the user can click on the ‘Save’ tab located on the right side of this section, just below the color section.